Hardware - SVBox IoT 1.0
Prepare the SD Card
Install and configure the main OS and the JOD Smart Van distribution on the SD card that will be inserted into the Raspberry Pi.
Currently, the JOD SmartVan Distribution OS image is not yet available. Therefore, after flashing the Raspberry Pi OS (Lite/64bit) onto the SD card, you'll need to configure a few files on the SD card before the first boot of the Raspberry Pi. Once the SmartVanBox is assembled and powered on, you can proceed with the manual installation of the JOD Smart Van Distribution.
This page is based on the Raspberry Pi OS Bookworm and later versions. If you are using the Bullseye version or earlier, please refer to the specific Prepare the SD Card Bullseye page.
Shorts-Steps
- Install Raspberry Pi Imager
- Select SD card and Operating System:
Raspberry Pi OS Lite (64-bit)at least versionBookworm - Edit OS customisation settings
- Write the SD Card
- Enable I2C ports via
configs.txt1 - Enable extra serial/UART ports via
configs.txt2 - Enable console on UART2 (
/dev/ttyAMA2) viacmdline.txt3
Install the Operating System
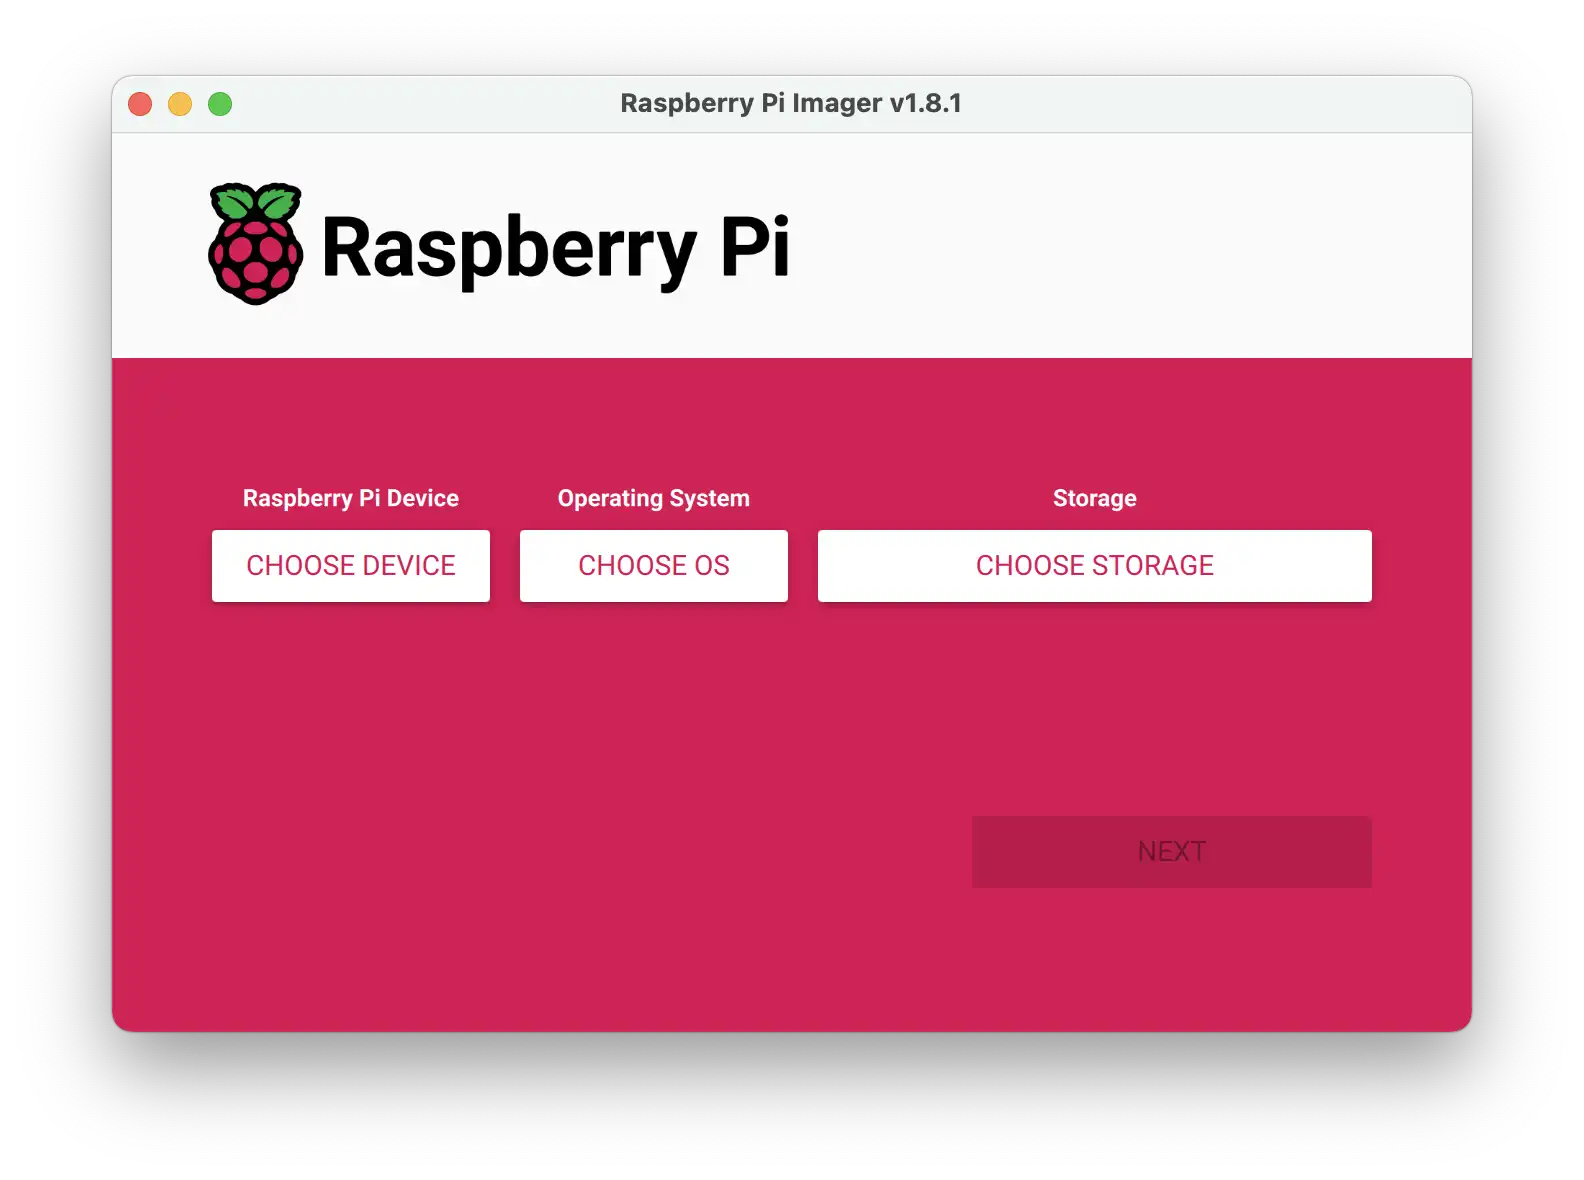
First, you need to install the operating system, commonly referred to as "flashing the SD card". In short, after inserting the SD card into a PC, you use software like Raspberry Pi Imager to "copy" the operating system onto the SD card.
After installing it on your working machine, launch the Raspberry Pi Imager and
choose your device: a Raspberry Pi 4. Then, choose the OS: Raspberry Pi OS (Others) > Raspberry Pi OS Lite (64-bit). This is a system without a desktop,
which is not necessary for an IoT device. Now, check that your SD card is
inserted into the computer and click the choose Storage button and select the
right SD card.
At the time of writing, the latest version of Raspberry Pi OS is
Bookworm. If you are using an older version, you must follow the steps
described in the Raspberry Pi Configs - DEPRECATED.
If you are using the "Bookworm" version or later, you can proceed with the
following steps.
Once you've selected the SD card and the operating system, proceed by clicking the "Next" button. Now a new window will appear, asking you to configure the operating system. Here you can set the SSH, hostname, user, WiFi and locales settings. Click on the "Edit settings" button and configure the following options:
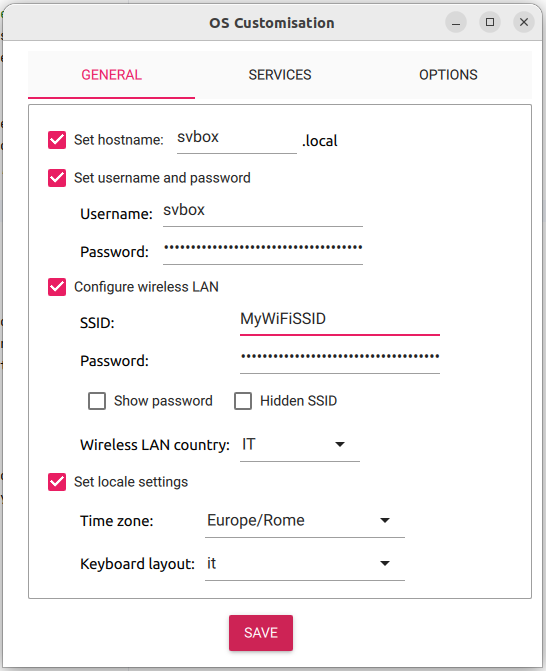
- General
- Enable the "Set hostname" option and set the hostname to
svbox - Enable the "Set username and password", note those credentials for remote access
- Enable the "Configure wireless LAN" option and set the SSID, password and country code of your WiFi network
- Enable the "Set locale" option and set the locale according to your location
- Enable the "Set hostname" option and set the hostname to
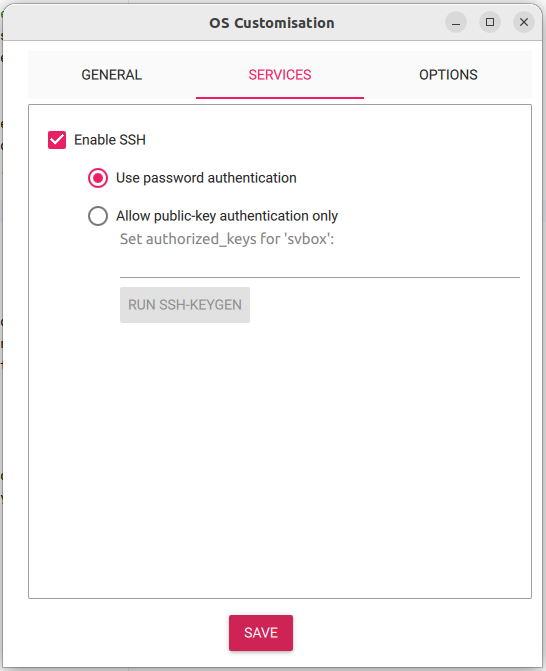
- Services
- Enable the "Enable SSH" option and select the "Use password authentication"
Save and close the settings window, then click the "Yes" button to start the writing process. Once the process is complete, remove the SD card and reinsert it into the computer to terminate the OS configuration.
Configure the Operating System
After writing the SD card, we need to proceed with some detailed configurations.
In this case, reinsert the SD card into the computer and open its boot
partition. Inside this folder, you'll find the files to configure the operating
system of our Raspberry Pi, such as the configs.txt or the cmdline.txt.
$ cd /media/{CURRENT_MACHINE_USER}/bootfs/
$ nano configs.txt
Once these configurations are complete, you can remove the SD card and insert it into the Raspberry Pi of the SmartVanBox.
Enabling I2C
With the introduction of the Raspberry Pi OS Bookworm version, this
procedure is no longer valid. In order to enable the I2C protocol, you need to
execute the following command after the first Raspberry Pi's boot:
sudo raspi-config nonint do_i2c 0
sudo reboot -n
Enabling UART Ports
Several hardware modules communicate with the Raspberry Pi using UART ports. In
the SmartVanBox, the several UART ports are used.
To enable these ports, add the following lines to the configs.txt file:
# Raspberry PI OS (Bookworm) and later
# uart0    > Bluetooth
# uart1    > SIM7600  > /dev/ttyS0   - GPIOs 14/15 - Pins 8/10
# --       > --       > /dev/ttyAMA1 - Do Not Exist
# uart2    > Console  > /dev/ttyAMA2 - GPIOs 0/1 - Pins 27/28
# uart3    > --       > /dev/ttyAMA3 - GPIOs 4/5 - Pins 7/29
# uart4    > UPS Pack > /dev/ttyAMA4 - GPIOs 8/9 - Pins 24/21
# uart5    > --       > /dev/ttyAMA5 - GPIOs 4/5 - Pins 7/29

enable_uart=1
dtoverlay=uart2
dtoverlay=uart3
dtoverlay=uart4
dtoverlay=uart5
| Usage | UART | File | TX GPIO | TX Pin | RX GPIO | RX Pin |
|---|---|---|---|---|---|---|
| Bluetooth | uart0 | N/A | ? | ? | ? | ? |
| SIM7600 | uart1 | ttyS0 | 14 | 8 | 15 | 10 |
| Debug/Console | uart2 | ttyAMA2 | 0 | 27 | 1 | 28 |
| NotUsed | uart3 | ttyAMA3 | 4 | 7 | 5 | 29 |
| UPS Pack V3 | uart4 | ttyAMA4 | 8 | 24 | 9 | 21 |
| NotUsed | uart5 | ttyAMA5 | 12 | 32 | 13 | 33 |
For more information on UART configuration, refer to Raspberry Pi's UART documentation or check the following links:
- Pi-4 Activating additional UART ports
- DID YOU KNOW THAT THE RASPBERRY PI 4 HAS MORE SPI, I2C, UART PORTS?
- Raspberry Pi 4 with Multiple UART Interfaces
- Raspberry OS - Configuring UARTs
Enabling Console on UART
The UART2 (/dev/ttyAMA2) port is used as a debug port. By connecting a USB-to-TTL
cable from a computer to the pins of this port, you can access the Raspberry Pi's
shell. This allows you to perform the initial configuration of the SmartVanBox,
access files, install software, and more. Unlike traditional SSH connection, no
WiFi network is needed.
To configure the UART2 port as a console, add the parameter console=ttyAMA2,115200
to the first line of the cmdline.txt file. The cmdline.txt file should look
like this:
console=tty1 console=ttyAMA2,115200 root=PARTUUID=556a8c7f-02 rootfstype=ext4 fsck.repair=yes rootwait
For more information on kernel command line, refer to Adafruit's Raspberry Pi Lesson 5.